Openfire Plugin Developer Guide
Introduction
Plugins enhance the functionality of Openfire. This document is a developer's guide for creating plugins.
Structure of a Plugin
Plugins live in the plugins directory of openfireHome. When a plugin is deployed as a JAR or WAR file, it is automatically expanded into a directory. The files in a plugin directory are as follows:
The web directory exists for plugins that need to add content to the Openfire Admin Console. Further details are below.
The plugin.xml file specifies the main Plugin class. A sample file might look like the following:
The meta-data fields that can be set in the plugin.xml file:
- name -- the name of the plugin.
- description -- the description of the plugin.
- author -- the author of the plugin.
- version -- the version of the plugin.
- date -- the date the plugin was released. The date must be in the form MM/dd/yyyy, such as 07/01/2006.
- url -- a URL where additional information about the plugin is available.
- minServerVersion -- the minimum version of Openfire required to run the plugin (supported by Openfire 2.1.2 and later). If the server version is less than the required value, the plugin will not be started.
- databaseKey -- if the plugin requires it's own database tables, the databaseKey element should
be set with a schema key name (often the same name as the plugin). Database
schema files for each supported database should then be placed in the database
directory of the plugin. For example, given the key "foo", schema files would be called
"foo_mysql.sql", "foo_oracle.sql", etc. We recommend that you prefix your tables with
"of" (openfire) to avoid conflicts with possible other applications installed in the same
database. The scripts should make an entry into the ofVersion table using the key so that
schema version information can be tracked, e.g.:
INSERT INTO ofVersion (name, version) VALUES ('foo', 0);
- databaseVersion -- the database schema version (if a database schema is defined). New plugins
with a database schema should start at version 0. If future versions of the plugin
require updates to the schema, those updates can be defined by creating sub-directories
in the database/upgrade directory for each version number. For example, the directories
database/upgrade/1 and database/upgrade/2 would contain scripts such as
"foo_mysql.sql" and "foo_oracle.sql" that contain the relevant database changes for each
version. Each script should update version information in the ofVersion table, e.g.:
UPDATE ofVersion set version=1 where name='foo';
- parentPlugin -- the name of the parent plugin (given as "foo" for the "foo.jar" plugin). When a plugin has a parent plugin, the parent plugin's class loader will be used instead of creating a new class loader. This lets plugins work together more closely. A child plugin will not function without its parent present.
- licenseType -- indicates the license agreement that the plugin is governed by. Valid
values are:
- "commercial": the plugin is released under a commercial license agreement.
- "gpl": the plugin is released under the GNU Public License (GPL).
- "apache": the plugin is released under the Apache license.
- "internal": the plugin is for internal use at an organization only and will not be re-distributed.
- "other": the plugin is released under a license agrement that doesn't fall into one of the other categories. The license agreement should be details in the plugin's Readme.
- readme.html -- Optional readme file for plugin, which will be displayed to end users.
- changelog.html -- Optional changelog file for plugin, which will be displayed to end users.
- logo_small.png -- Optional small (16x16) icon associated with the plugin. It can also be a .gif file.
- logo_large.png -- Optional large (32x32) icon associated with the plugin. It can also be a .gif file.
Your plugin class must be implement the Plugin interface from the Openfire API as well as have a default (no argument) contructor. The Plugin interface has methods for initializing and destroying the plugin.
General Plugin Best Practices
When choosing a package name for your plugin, we recommend that you choose something distinctive to you and/or your organization to help avoid conflicts as much as possible. For example, if everyone went with org.example.PluginName, even if PluginName was different, you might start running into some conflicts here and there between class names. This is especially true when working with clustering.
.Modifying the Admin Console
Plugins can add tabs, sections, and pages to the admin console. There are a several steps to accomplishing this:
- An <adminconsole/> section must be added to the plugin.xml file.
- JSP files must be compiled and put into the classpath of the plugin. A web.xml file containing the compiled JSP servlet entries must be put into the web/ directory of the plugin. Note: the Openfire build script can assist with compiling JSPs and creating the web.xml. This is detailed below.
- Any images required by your JSP pages must live in web/images/ directory. Only GIF and PNG images are supported.
The <adminconsole /> section of plugin.xml defines additional tabs, sections and entries in the Admin Console framework. A sample plugin.xml file might look like the following:
In this example, we've defined a new tab "Example", a sidebar section "My Plugin" and a page "My Plugin Admin". We've registered my-plugin-admin.jsp as the page. You can override existing tabs, sections, and items by using the existing id attribute values in your own <adminconsole> defintion.
Admin Console Best Practices
There are several best practices to consider when making changes to the Openfire admin console via a plugin. The general theme is that plugins should integrate seamlessly:- Integrate into existing tabs and sidebar sections whenever possible instead of creating your own. Only create new tabs for very significant new functionality.
- Don't use the word "plugin" in names of tabs, sidebars and items. For example, instead of having an item called "Gateway Plugin", it could be called "Gateway Settings".
- Try to match the UI of the existing admin console in your custom plugin pages.
- There is no need to create an admin console entry to show plugin meta-data. Instead, let Openfire inform the user about which plugins are installed and provide plugin management.
Writing Pages for the Admin Console
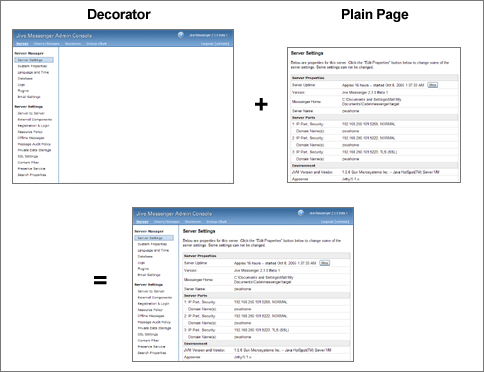
Openfire uses the Sitemesh framework to decorate pages in the admin console. A globally-defined decorator is applied to each page in order to render the final output, as in the following diagram:
Creating pages that work with Sitemesh is easy. Simply create valid HTML pages and then use meta tags to send instructions to Sitemesh. When rendering the output, Sitemesh will use the instructions you provide to render the decorator along with any content in the body of your HTML page. The following meta tags can be used:
- pageID -- the ID of the page, which must match an entry in the admin console XML described above. Either a pageID or subPageID must be specified.
- subPageID -- the ID of the sub-page, which must match an entry in the admin console XML described above. Sub-pages are used for administrative actions related to a parent page ID. For example, editing or deleting a particular group. Either a pageID or subPageID must be specified.
- extraParams (Optional) -- extra parameters that should be passed in to the page. For example, on a page to delete a group it might be the ID of the group. Parameters must be URL encoded.
- decorator (Optional) -- overrides the Sitemesh decorator to use for the page. A decorator named none is available that will simply render the page without a decorator.
Using i18n in your Plugins
It's possible to translate your plugin into multiple languages (i18n). To do so, use the following procedure:
- Create a "i18n" directory in the root directory of your plugin.
- Add each resource file using the %[plugin_name]%_i18n "_" language ".properties" naming convention, where [plugin_name] is the name of the plugin directory. See the translator guide for more information about resource bundles.
- Convert Strings in your JSP files to refer to the internationalized keys. For example:
<%@ taglib uri="http://java.sun.com/jstl/core_rt" prefix="c" %> <%@ taglib uri="http://java.sun.com/jstl/fmt_rt" prefix="fmt" %> ... <fmt:message key="some.key.name" /> - Internationalize Strings in your Java files using the LocaleUtils class:
org.jivesoftware.util.LocaleUtils.getLocalizedString("some.key.name", "[plugin_name]"); - Internationalize Strings in your plugin.xml file using the ${var} format:
<sidebar id="gateways" name="${plugin.sidebar.name}" description="${plugin.sidebar.description}">
<description>${plugin.description}</description>
Using the Openfire Build Script
The Openfire build script will help you build and develop plugins. It looks for plugin development directories in the following format:
The build script will compile source files and JSPs and create a valid plugin structure and JAR file. Put your plugin directories in the src/plugins directory of the source distribution and then use ant plugins to build your plugins.
Any JAR files your plugin needs during compilation should be put into the lib directory. These JAR files will also be copied into the plugin's generated lib directory as part of the build process.
If you create a src/web/WEB-INF/web.xml file, any servlets registered there will be initialized when the plugin starts up. Only servlet registrations and servlet mappings will be honored from the web.xml file. Note: this feature is implemented by merging your custom web.xml file into the web.xml file generated by the JSP compilation process.
Implementing Your Plugin
Plugins have full access to the Openfire API. This provides a tremendous amount of flexibility for what plugins can accomplish. However, there are several integration points that are the most common:
- Register a plugin as a Component. Components receive all packets addressed to a particular sub-domain. For example, test_component.example.com. So, a packet sent to joe@test_component.example.com would be delivered to the component. Note that the sub-domains defined as components are unrelated to DNS entries for sub-domains. All XMPP routing at the socket level is done using the primary server domain (example.com in the example above); sub-domains are only used for routing within the XMPP server.
- Register a plugin as an IQHandler. IQ handlers respond to IQ packets with a particular element name and
namespace. The following code snippet demonstrates how to register an IQHandler:
  IQHandler myHandler = new MyIQHander();
  IQRouter iqRouter = XMPPServer.getInstance().getIQRouter();
  iqRouter.addHandler(myHandler);
- Register a plugin as a PacketInterceptor to receive all packets being sent through the system and optionally reject them. For example, an interceptor could reject all messages that contained profanity or flag them for review by an administrator.
- You can store persistent plugin settings as Openfire properties using the JiveGlobals.getProperty(String) and JiveGlobals.setProperty(String, String) methods. Make your plugin a property listener to listen for changes to its properties by implementing the org.jivesoftware.util.PropertyEventListener method. You can register your plugin as a listener using the PropertyEventDispatcher.addListener(PropertyEventListener) method. Be sure to unregister your plugin as a listener in your plugin's destroyPlugin() method.
Plugin FAQ
Can I deploy a plugin as a directory instead of a JAR?No, all plugins must be deployed as JAR or WAR files. When a JAR or WAR is not present for the plugin, Openfire assumes that the file has been deleted and that the users wants to destroy the plugin, so it also deletes the directory.